
Calling Rust from Swift: A Practical Guide for iOS Development
Modern graphical user interface (GUI) programming is complex. Each platform generally has a prescribed programming language to construct user interfaces and if you are writing an application that targets each of these, it pays to be able to reuse code.
A common way to do this is to write the core logic of the application in a programming language that can target a intermediate interface and use this to share code across different targets.
Early versions of the Spotify app used this approach to deliver uniform user experiences that do not feel out of place on the host platform.
The following guide illustrates how create such an interface by demonstrating the process of calling a binary search routine written in Rust from Swift via a C interface.
The focus will be on configuring Xcode, Apple's integrated development environment (IDE), to compile the necessary components and construct the bridge between Swift and Rust.
Building the Core Logic in Rust
Begin by installing Rust through Cargo.
You will also need additional Rust compiler toolchains to build the library for different targets.
rustup target add aarch64-apple-ios aarch64-apple-ios-simOnce installed, create a static library to house the Rust code intended for export to Swift.
In your terminal, execute the following commands (assuming the project directory will reside on your desktop):
mkdir ~/Desktop/RustFromSwift && cd ~/Desktop/RustFromSwift
cargo new --lib binary_searchThis generates a Rust library template.
Next, modify the Cargo.toml file to instruct the compiler to produce a static library:
[lib]
crate-type = ["staticlib"]
Then, replace the contents of lib.rs with the following implementation of a binary search routine:
use core::slice;
use std::ffi::c_long;

#[no_mangle]
pub unsafe extern "C" fn binary_search(
  a: *const c_long,
  n: c_long,
  x: c_long,
) -> c_long {
  if a.is_null() {
    return -1;
  }
  let s = unsafe { slice::from_raw_parts(a, n as usize) };
  debug_assert!(s.is_sorted(), "a is not sorted");
  s.binary_search(&x).unwrap_or_else(|i| i) as c_long
}
This function uses C types from Rust's std::ffi module for compatibility. It constructs a Rust slice s from a raw pointer a and length n, representing an array of integers. After a debug assertion to ensure the slice is sorted, a binary search for the value x is performed. The result, the index of x or the index where it could be inserted, is then returned.
The #[no_mangle] attribute prevents name mangling, ensuring the function retains its name when called from Swift.
Bridging the Gap: The C Interface
A bridging header is required to expose the Rust function to other languages. While tools like cbindgen can automate this process, for this simple example, manual creation suffices. Create the header file:
mkdir bridge && touch bridge/binary_search_bridge.hbridge that will house the bridging header.And populate it with the following contents:
#ifndef BINARY_SEARCH_H
#define BINARY_SEARCH_H

long binary_search(const long* a, long n, long x);

#endif // BINARY_SEARCH_HTo validate this setup, create a simple C program binary_search_bridge_test.c that calls the exported function:
#include <stdio.h>
#include <stdlib.h>

#include "binary_search_bridge.h"

int main(void) {
  long a[] = {2, 5, 8, 12, 16, 23, 38, 56, 72, 91};
  long n = sizeof(a) / sizeof(long), x = 56, want = 7;
  long got = binary_search(a, n, x);
  if (got != want) {
    fprintf(stderr, "binary_search(a, n, x) = %ld, want %ld\n", got, want);
    return EXIT_FAILURE;
  }
}Build the Rust library.
cargo buildbinary_search).Then compile and run the C program.
cc -Wall -Wextra ../binary_search/target/debug/libbinary_search.a \
  binary_search_bridge_test.c -o binary_search_bridge_test
./binary_search_bridge_testbridge and run the program.The absence of output confirms the correct functionality.
Integrating with Swift and iOS
Using Xcode, create a new SwiftUI app project named "Searchly" in the parent directory (refer to Apple's documentation for detailed instructions).
Replace the contents of ContentView.swift with the following.
import SwiftUI
struct ContentView: View {
let a = (0 ... 8)
.map({ _ in Int.random(in: 0 ... 16) })
.sorted()
let x = Int.random(in: 0 ... 32)
@State var i = -1
var body: some View {
VStack(alignment: .leading, content: {
Text("a = \(self.a.description)")
.monospaced()
.padding(.vertical, 2)
Text("x = \(self.x)")
.monospaced()
.padding(.vertical, 2)
Text("i = \(self.i)")
.monospaced()
.padding(.vertical, 2)
})
.padding()
Button("Search", action: self.search)
.bold()
.padding()
}
// TODO: Implement.
func search() {}
}
#Preview {
ContentView()
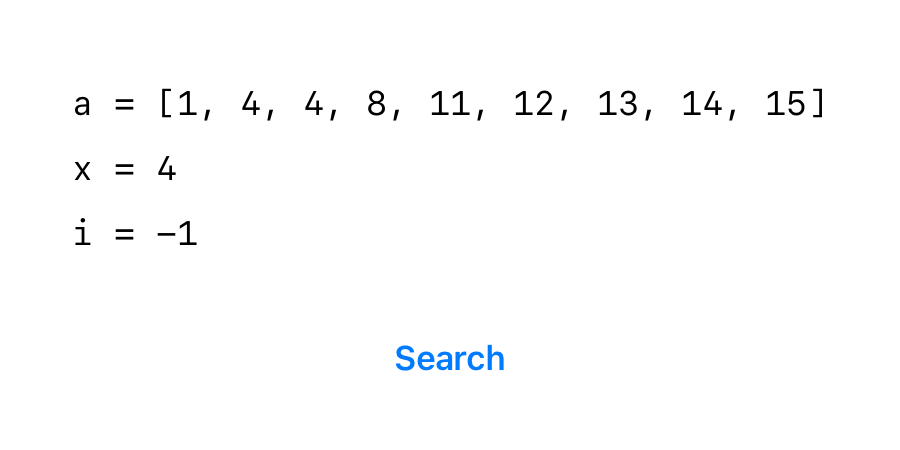
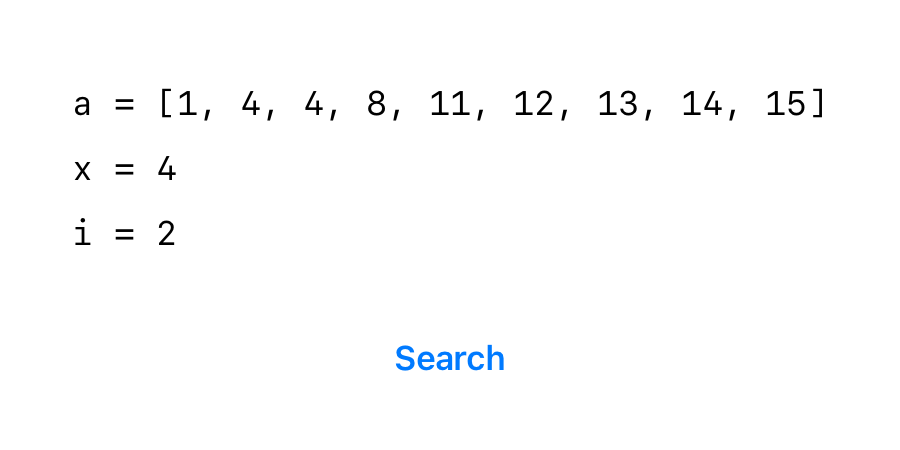
}This code displays a sorted array of random integers and a search button, preparing the user interface for the integration of the Rust binary search.
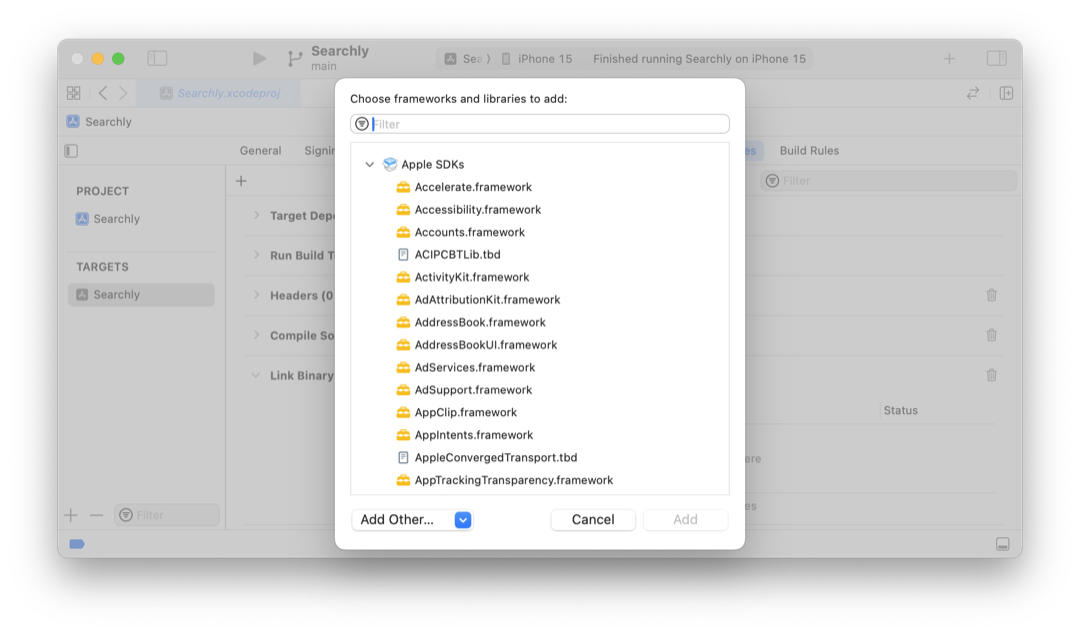
Link the Rust library to the Xcode project. In the project target's "Build Settings", locate "Link Binary with Libraries" and add a new library by clicking the "+" button.
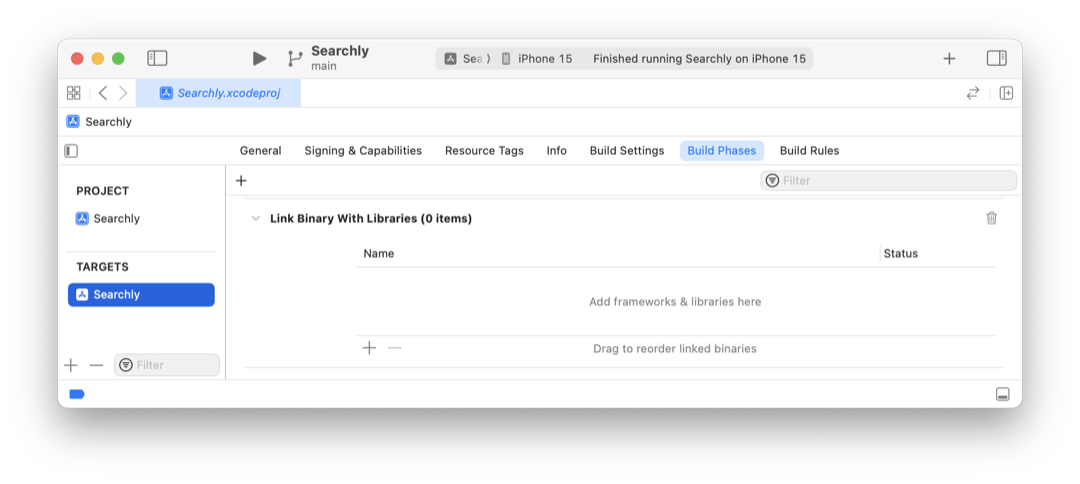
A popup will appear prompting you to choose a library. In the drop-down menu, on the bottom-left corner select "Add files...", navigate to binary_search/target/debug in the parent directory, and choose libbinary_search.a.
Compile the Rust library for both simulator and device targets.
cargo build \
  --target aarch64-apple-ios \
  --target aarch64-apple-ios-sim
cargo build \
  --target aarch64-apple-ios \
  --target aarch64-apple-ios-sim \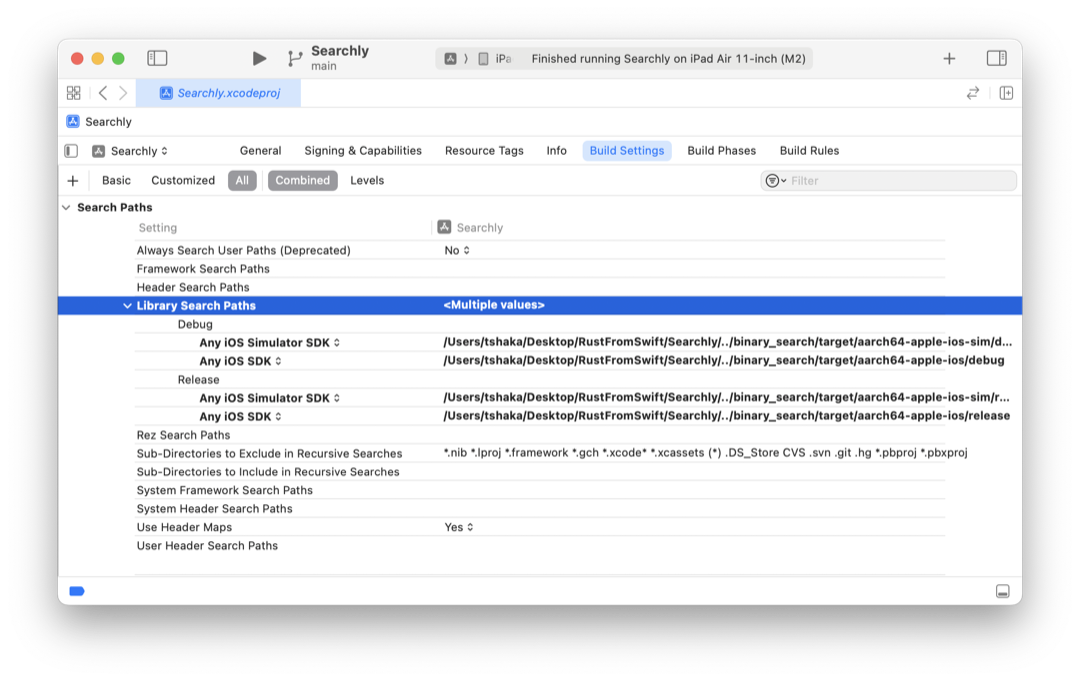
--releaseConfigure the library search paths in Xcode's "Build Settings" under "Search Paths" > "Library Search Paths".
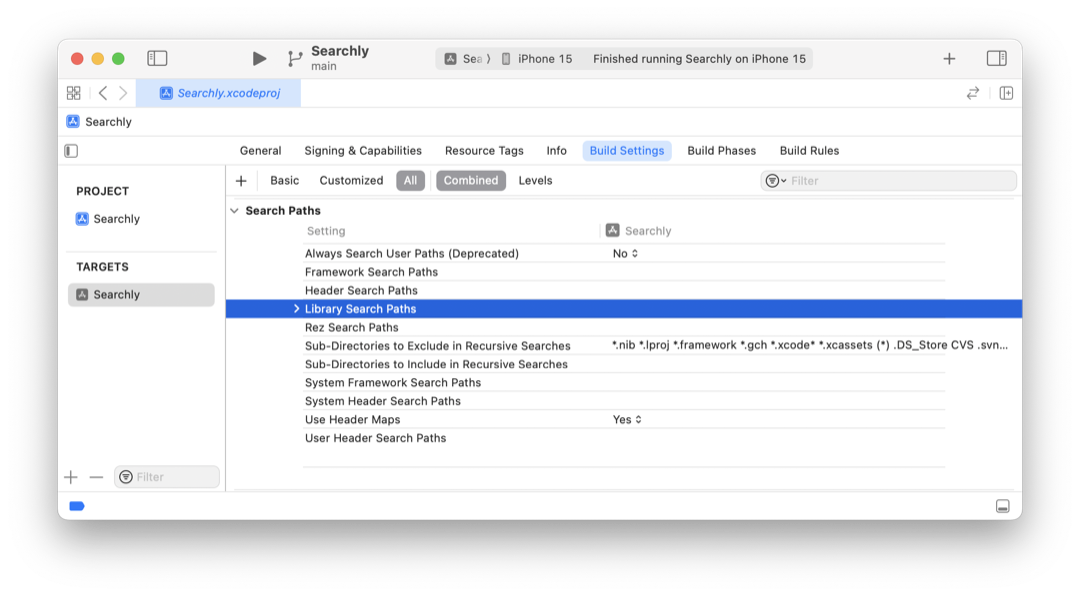
Add the appropriate paths for debug and release builds, ensuring Xcode correctly expands the $(PROJECT_DIR) variable if the library path is relative to the project directory.
For example, the debug build entry for the iOS target would be $(PROJECT_DIR)/../binary_search/target/aarch64-apple-ios/debug.
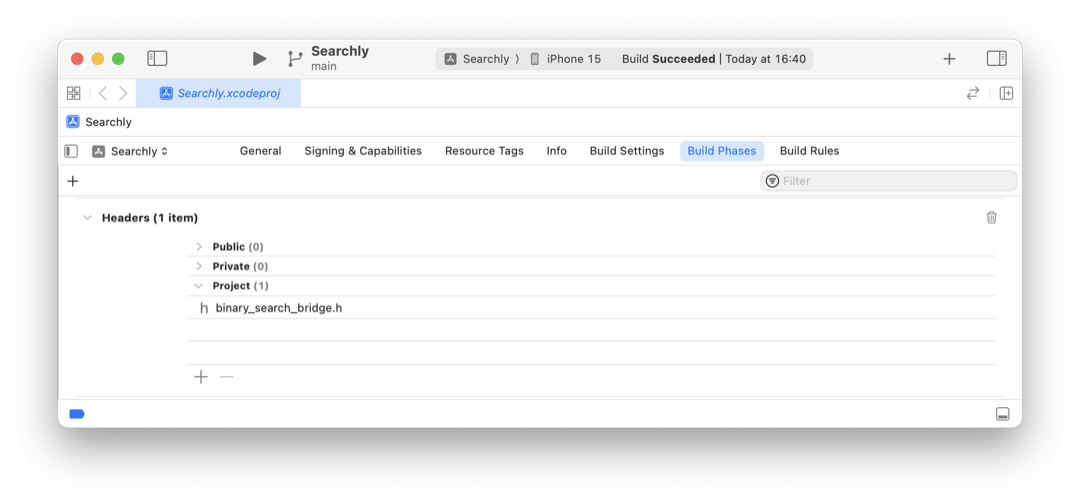
Finally, incorporate the bridging header.
Add a "New Headers Phase" in "Build Phases" by clicking the "+" button on the top-left. This will create a new section named "Headers". Expand it and use the "+" button to locate the bridging header binary_search_bridge.h defined earlier.
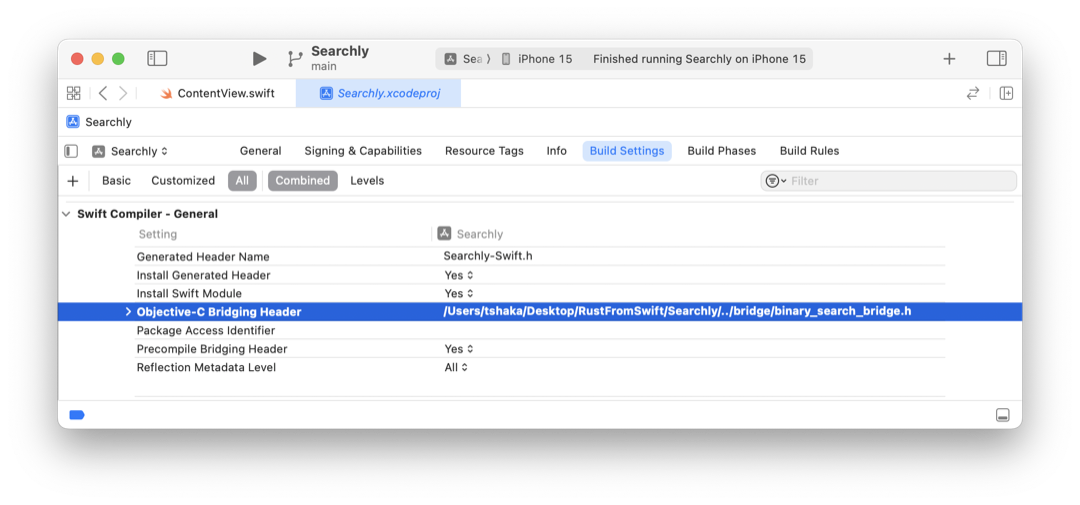
Specify the bridging header path in "Build Settings" under "Swift Compiler - General" > "Objective-C Bridging Header".
And now with the bridging header in place, implement the search function in ContentView.swift:
func search() {
  self.i = binary_search(
    self.a.withUnsafeBufferPointer({ $0.baseAddress }),
    self.a.count,
    self.x
  )
}search action for the button.Run the application. Tapping the "Search" button will now execute the binary search routine, updating the displayed index accordingly.
Conclusion
This guide provided a practical introduction to calling Rust code from Swift, highlighting the key steps in setting up the necessary bridges between these languages. ■
The code referenced here is available on the blog's repository.